This is not how you should caulk!
Caulking seems simple, but a small mistake is immediately visible. Find out how to avoid common mistakes and how to get a perfectly neat caulk line!
Caulking might seem like an easy job, but nothing could be further from the truth. A bad caulk line not only looks unattractive but can also be really annoying. In this blog we cover the most common mistakes when caulking and how to do it the right way. Whether you have applied Renovlies or fibreglass wallpaper, a neat caulk line makes all the difference. Our team can handle everything from A to Z, so read on and avoid these common mistakes!
Why is good caulking so important?
Caulk is often used to seal joints and gaps so they are watertight and dust-free. It prevents mould growth and gives a tidy finish. Especially when applying Renovlies or fibreglass wallpaper, a neat caulk line is important. Unfortunately, many people make major mistakes when caulking, which undermines the quality of the finish.

Photo 1 Example of poorly caulked walls
Common caulking mistakes
Using the wrong type of caulk
Not all types of caulk are suitable for every application. Using the wrong caulk can result in joints that peel away or discolour. For bathrooms and kitchens, silicone caulk is essential, while acrylic caulk is better for paintwork and walls with Renovlies or fibreglass wallpaper.
Not using a primer
A common mistake is applying caulk directly without using a primer or impregnating agent first. This can cause the caulk to not bond properly and eventually come loose. Especially on surfaces with lots of small holes, a primer is important to ensure good adhesion.
No smooth finish
Many DIYers apply caulk without smoothing it out. This results in bumpy and uneven joints. Always use a damp finger, a caulking spatula or a special caulk smoother for a neat result.
Applying caulk to a dirty surface
Dust, grease and dirt can prevent the caulk from bonding properly. Always clean the surface with a suitable cleaning agent before you start caulking.
Caulk layer too thick or too thin
A caulk layer that is too thick looks messy and does not dry properly, while a layer that is too thin can crack. Make sure you use the right width and thickness for an optimal and durable finish.

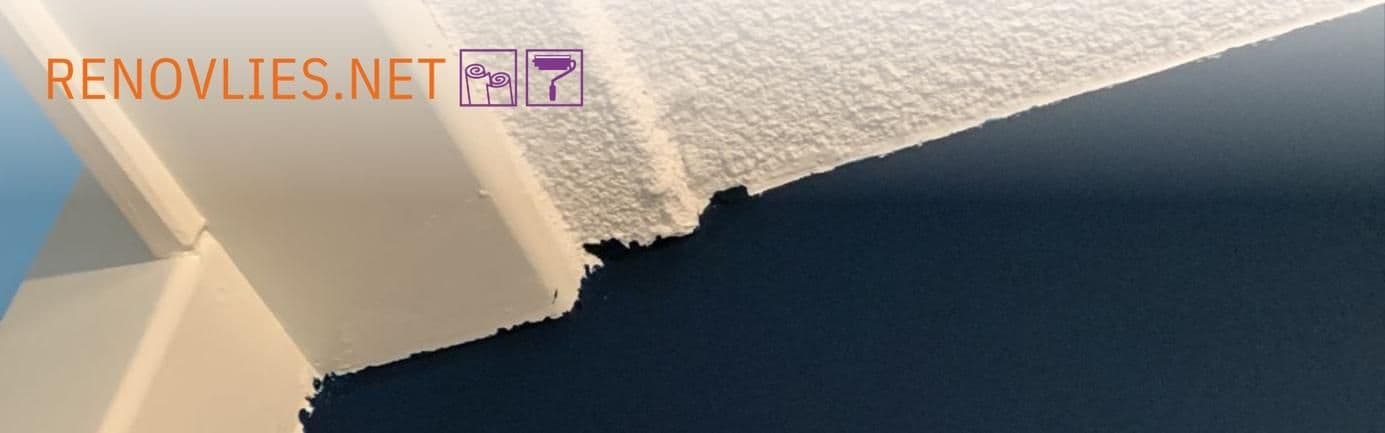
Photo 2 This is not how you caulk
How to caulk properly!
Now that you know which mistakes to avoid, it is time to follow the right steps. Follow this guide for a perfectly finished caulk line:
Step 1: Apply primer
Primer helps the caulk bond better to the surface, especially on porous or absorbent surfaces. Apply primer evenly and let it dry completely before you start caulking.
Step 2: Choose the right caulk
Determine the application and choose the right type of caulk. Use acrylic caulk for walls and paintwork, preferably a non-crack acrylic caulk.
Step 3: Clean the surface
Remove dust, grease and dirt from the joints using a suitable degreaser. Let the surface dry thoroughly before you begin.
Step 4: Use masking tape
Want clean lines? Apply painter's tape along the edges of the joint. This prevents caulk from spreading and gives a great result.
Step 5: Apply the caulk evenly
Use a caulking gun and apply the caulk evenly in one smooth, continuous motion. Make sure the entire joint is properly filled.
Step 6: Smooth the caulk
Use a wet finger, a caulking spatula or a special finishing spatula to pull the caulk line tight and smooth. This prevents bumps and irregularities.
Step 7: Remove the tape
Pull off the masking tape immediately before the caulk dries. Wipe away any excess caulk with a damp cloth for a perfect result.
Step 8: Masking tape
Once the first caulk layer is completely dry, apply masking tape along the caulk line again. This prevents paint from getting onto unwanted areas and gives you a neat finish when painting.

Photo 3 Well caulked wall
Step 9: Paint the caulk line
Apply paint over the fully cured caulk line using a suitable wall paint or lacquer. Work carefully and remove the tape immediately after painting to avoid damage.
Leave it to the experts!
Want to be sure of a perfect result? Our team at Renovlies.net can handle everything from A to Z! We take care of a neat finish on your walls and ceilings with Renovlies or fibreglass wallpaper and of course a tidy caulk line. Contact us for professional advice and expert finishing!
With the right techniques and materials, anyone can apply a neat caulk line. Avoid the common mistakes and work carefully. Want a truly neat result? Then leave it to the experts at Renovlies.net!